Developing for EMV, Part I
ID TECH makes and markets a wide variety of payment devices, almost all of which, nowadays, are compatible with “chip cards” (or “smart cards”). Payments made with a chip card are generically referred to as “contact EMV,” or sometimes just “EMV.” (EMV, of course, stands for Europay, MasterCard, and Visa; the card-brand consortium.)
In industry terms, an EMV transaction is one that conforms to the requirements of the four-volume EMV Integrated Circuit Card Specifications for Payment Systems (available from https://www.emvco.com/). Wrapping your head around this spec takes time. At four volumes, it’s a pretty extensive specification. ID TECH tries to make “EMV compatibility” an easy-to-reach goal for developers, however, by offering a variety of free tools, SDKs, demos, and other resources designed to accelerate time-to-market for POS integrators and others who need quick EMV compliance.

EMV: Where to Start?
Most new ID TECH customers are pretty technically savvy. But even so, there’s a lot of variation in the degree of EMV knowledge customers bring to a new project. Most customers know payment systems very well in the context of MSR (magstripe readers). Some have worked with EMV before, but don’t know contactless EMV. Others are new to EMV itself.
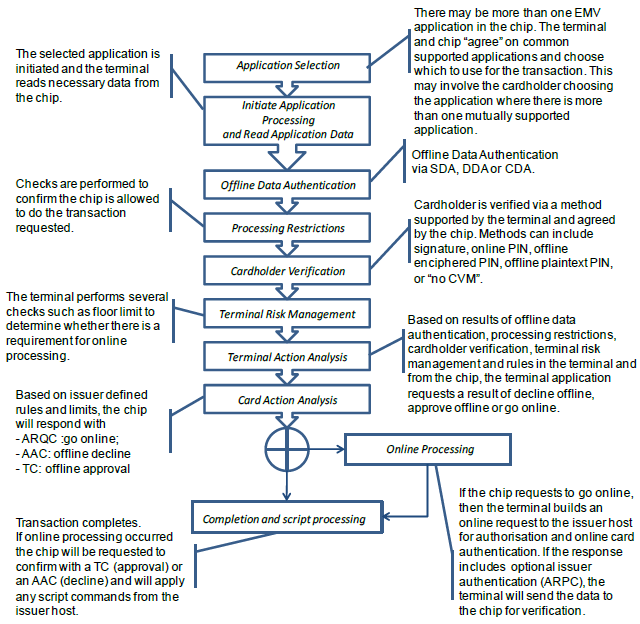
As a point of reference, we usually recommend to integrators that they take a look at ID TECH’s free white paper called EMV Transactions with the Universal SDK. The first half of this 25-page white paper is a refresher on EMV event flow. The major events of that flow can be summarized this way:

At each stage of this process, the card reader talks to the chip on the smart card, using some very low-level protocols defined in ISO-7816. Almost all of the card-reader logic for this is cordoned off in what’s known as an EMV Level 2 kernel. In other words, it’s out of reach for the payment-app developer, who only needs to worry about issuing commands to the kernel (not to the card itself). Even that’s a bit of a misstatement. The payment app developer will actually send commands to the reader; and the reader will handle the necessary underlying interactions with the kernel, which (in turn) will interact with the card.
Communicating with the Reader
How do you send commands to the reader? There are two choices:
- Establish connectivity (typically using USB or RS-232) with the reader, and send firmware commands to it directly. Or else:
- Using a high-level-language SDK, write code (in C/C++, C#, Objective-C, Java, or Swift) that harnesses the appropriate ID TECH SDK library to issue the underlying firmware command(s).
The second method is generally easier, since it takes comparatively little time to master the high-level-language APIs of ID TECH’s Universal SDK (plus, we give you lots of sample code to build on). The down side to No. 2 is that it does tend to tie your app to a single development language and operating system. With No. 1, the choice of language (and OS) is up to you, but you have to learn the (byte-level) firmware command API for the device in question, and handle all connectivity issues yourself.
Regardless of whether you decide to talk to the card reader directly (via serial connection, using raw firmware commands), or using the built-in connectivity and high-level commands of the Universal SDK, it’s important to understand that an EMV transaction (and here, I’m talking about traditional contact EMV, not contactless) takes place in three stages. In Universal SDK parlance, we refer to these stages as Start Transaction, Authenticate Transaction, and Complete Transaction. (Each has a corresponding method or function in the USDK.) From a program-flow point of view, this means the kernel hands control back to the caller twice, during the transaction flow: once, after Start Transaction returns; and a second time, after Authenticate Transaction (but before Complete Transaction). These halt points have important implications for data flow, because for one thing, different TLVs (tag-length-value triplets) are returned after each transaction phase, and it’s important to grab the TLVs you need at the time they’re available, because they might not be available in a later phase. Typical example: Tag 57 (Track 2 data) is available at the end of Start Transaction (but not at the end of Complete Transaction).
Cryptograms in EMV
One of the most important data items in any EMV transaction is the Application Cryptogram that’s returned in tag 9F26. A contact EMV session typically produces two cryptograms (9F26 is returned twice): one comes before Complete Transaction, the other comes after. The event that prompts the card to produce the cryptogram is called a Gen AC (Generate Application Cryptogram) request.
The reason these cryptograms are important is that they constitute the non-repudiable proof that a genuine, legitimate chip card was physically present for a given transaction. (They also certify as to the particular data values that arose during that transaction.) At Gen AC time, the L2 kernel presents the chip card with a data object list (containing data specific to the current transaction), and the chip card responds by using its private key (known only to the chip) to sign that data and produce a non-counterfeitable digital artifact (an 8-byte cryptogram) that attests to the legitimacy of the card and data. The cryptogram’s legitimacy can be verified by the online authority who will ultimately authorize the transaction (or decline it, depending). This is why chip cards were invented, and why EMV exists. Magnetic stripe data is easy to counterfeit. Cryptograms produced on-demand by a chip are not easy to counterfeit.
In my next post, we’ll continue this discussion by looking at what kinds of cryptograms the card can produce, what they mean, what the payment-app developer needs to do with them, and how they impact the success or failure of a transaction. Don’t miss Part II!
Have questions about EMV transactions? Card readers? Contactless technology? Digital wallets? Contact our experts:
