Talk to a Credit Card Reader Over RS-232 with Google Chrome
One of the nice things about ID TECH card readers is how ridiculously easy it is to communicate with them. Did you know, for example, that you can talk to most of our payment peripherals via your Google Chrome web browser? Let’s talk about how to do that, because it’s tremendously handy to be able to talk to serial and/or USB devices using nothing more than JavaScript and HTML.
For this article, I’m going to focus on the RS-232 version of ID TECH’s SRED-compliant SecuRED card reader (pictured below), which is a full-time-encrypting magnetic swipe reader (MSR) that can communicate via USB-HID, USB-KB, or RS-232. In future articles, we’ll talk in depth about how to connect to ID TECH readers over USB-HID (in Chrome). For today, we’ll concentrate on RS-232, which is slightly easier than USB, while illustrating many of the techniques that we’ll be using later for USB-HID communications.
If you’re saying “But my computer doesn’t even have an RS-232 port,” relax. You can connect a serial device to your computer using a serial-to-USB adapter cable (by Prolific, or another vendor). The serial data will still look like serial data, even though it’s coming through the USB port.
Google’s Chrome browser offers RS-232 connectivity via the chrome.serial.* API, but note carefully, the API in question is not available to ordinary web pages. To use the serial API, you have to implement a Chrome app and install that app using the Chrome extensions mechanism (which isn’t at all hard to do). Let’s take a look at what’s involved.
To create a Chrome app, you just need to put half a dozen small files in a folder. The complete, already-built app for today’s example (including the 6 small files you’ll need) can be found here:
Download the Zip file to your local drive and unpack it to its own folder. It should contain the following files:

I’ll talk about how to install the app as a Chrome extension in just a minute. But right now, let’s quickly look at the files that make up the app.
The background.js file is a text file containing the following text:
chrome.app.runtime.onLaunched.addListener(function() {
  chrome.app.window.create('window.html', {
    'outerBounds': {
      'width': 390,
      'height': 438
    }
  });
});
This file lets Chrome know that it should use a file called window.html to create the app’s main window (with a width of 390 pixels and a height of 438 pixels).
The next two files are simply small PNG icons.
The manifest.json file is a text file containing the following:
 {
  "name": "Serial Test Utility",
  "description": "A Chrome App for reading serial connections. Copyright 2016 ID TECH.",
  "version": "0.1",
  "manifest_version": 2,
  "app": {  "background": { "scripts": ["background.js"] } },
  "icons": { 	"16": "IDTechLogo16.png",
		"128": "IDTechLogo128.png"
	   },
  "permissions": [ "browser", "serial" ]
}
The manifest is an important file, because Chrome apps run in a unique security environment in which (for example) permissions must be specified explicitly, in advance. The manifest tells Chrome which permissions are needed, which icons should be associated with the app, and other essential info.
The script.js file (which will be referenced from window.html) contains all of the JavaScript that makes our app function. It consists of the following code:
/*
Serial Test Utility
by Kas Thomas
Copyright 2016 by ID TECH
Visit: idtechproducts.com

Code is provided for educational purposes only.
Use at your own risk.
*/

var COM3 = "COM3"; // for Linux, change this to something like "/dev/tty0" or "/dev/ttyUSB0"
var connectionId;
var outputNode = document.getElementById("outputNode"); // get the text area node
var WAIT_TIME = 500; // accumulate data for 500 msec
var options = {
  'bitrate': 19200,
  'dataBits': 'eight',
  'parityBit': 'no',
  'stopBits': 'one'
}

// UI
document.addEventListener('DOMContentLoaded', function () {
    document.getElementById('actionButton').addEventListener( 'click', btnSend );
    document.getElementById('clearButton').addEventListener( 'click', clearAll );
    document.getElementById('selection').addEventListener( 'change', writeToUserText );
    document.getElementById('connectButton').addEventListener( 'click', connect );
    enumerate();
    connect(COM3);
});

function enumerate() {
 // On startup:
 chrome.serial.getDevices( function( devices ) {
   for (var i = 0; i < devices.length; i++) {
       	var info = devices[i];
       	writeOutput( "nDevice " + i + "n");
       	writeOutput( "   path: " + info.path + "n");
       	writeOutput( "   vendorId: " + info.vendorId + "n");
       	writeOutput( "   displayName: " + info.displayName + "n");
   	}
   } );
}

function connect( port ) {

try {
	chrome.serial.connect( port, options, function(info) {
                if (!info)
			return;
    		connectionId = info.connectionId;
    		console.log("Connection established.");
		writeOutput("nConnection established.");

		try {
		for (var k in info)
			writeOutput("n" + k + ": " + info[k].toString() );
		}
		catch(e) { console.log("Error: " + e.toString() ); }
  	});
   }
   catch(e) { console.log("Exception while trying to connect: " + e.toString() ); }
}

function clearAll() {
    document.getElementById("cmd").value = "";
    document.getElementById("outputNode").value = "";
}

function getSelection() {
    var selection = document.getElementById("selection").value;
    return selection;
}

function writeToUserText( str ) {
    document.getElementById("cmd").value = getSelection();
}

// Take s = "020400724609013cc203" and turn it
// into [2, 4, 0, 114, 70, 9, 1, 60, 194, 3]
function hexStringToNumericArray( s ) {
	var array = s.match(/../g);
	var output = [];

	for ( var i = 0; i < array.length; i++ )
		output.push( 1 * ("0x"+array[i] ) );

	return output;
}

function commandStringToArrayBuffer( s ) {
	var numericArray = hexStringToNumericArray(s);
	var uint8 = new Uint8Array( numericArray);
	return uint8.buffer;
}

// SEND
var btnSend = function() {
  var ab;
  var cmd = document.getElementById("cmd");
  var userText = cmd.value;

  cmd = userText.replace(/s/g,""); // just pass the command as-is
  ab = commandStringToArrayBuffer( cmd );
  chrome.serial.send(connectionId,   ab , function() {} );
  writeOutput( "nSent: " + cmd.match(/../g).join(" ") );
}

// convert ArrayBuffer to hex string
function arrayBufferToHex( array ) {
	var output = "";
	var dv = new DataView( array );
	var len = dv.byteLength;
	for ( var i = 0; i < len; i++) {
		var item = dv.getUint8( i );
		var hex = item.toString( 16 );
		if (hex.length < 2)
			hex = '0' + hex;
		output += hex + " ";
	}

	return output;
}

// write to the app's HTML page
function writeOutput( value ) {
	if (document)
		outputNode = document.getElementById("outputNode");
	else throw ("No output node!");

	if (outputNode) {
		outputNode.value += value ;
		outputNode.scrollTop = outputNode.scrollHeight;
	}
	else
		console.log("outputNode was null.");
}

responseData = { busy:false, data:"" }; // accumulate response data here

function report() {
	writeOutput( "nReceived:n" + responseData.data + "n");
	responseData.busy = false;
	responseData.data = "";
}

function collect( text ) {
	if ( responseData.busy == false )
		setTimeout( report, WAIT_TIME );
	responseData.busy = true;
	responseData.data += text;
}

receiver = function( info ) {
	var data = info.data;
	var str = arrayBufferToHex( data );
	collect( str );
        console.log( "Received: " + str + "rnFrom: " + info.connectionId );
};

chrome.serial.onReceive.addListener(receiver);
Okay. That may not seem like a small file, but in reality, we’re talking about less than 200 lines of code, which (in the scheme of things) is actually a pretty trivial amount of code.
Finally, there’s window.html, which is the file containing our app’s HTML markup (the user interface for the app). It consists of the following markup:
<!DOCTYPE html>
<html>
  <head>
        <script src="/script.js"></script>
  </head>

  <body style="background-color:#ddd;">

    <div style="font-family:Times,Georgia,serif;color:#242;font-size:24pt;">Serial Test Utility</div>
    <div style="font-size:8pt;">Copyright 2016 ID TECH</div><br/>

    <!-- CONNECT BUTTON -->
    <input type="button" value="Connect" id="connectButton" />

    <!-- TEXT AREAS -->
    <textarea rows="14" cols="48" id="outputNode">A test utility to send NGA commands over a serial connection.</textarea>

    <br />
    <textarea rows="2" cols="48" id="cmd"></textarea>
    <br />

    <!-- ACTION BUTTONS (SEND AND CLEAR) -->
    <input type="button" value="Send" id="actionButton" />
    <input type="button" value="Clear" id="clearButton" />

    <!-- COMMAND EXAMPLES to pre-load -->
    <select id="selection">
  	<option value=""><b>Select a command and hit Send...</b></option>
  	<option value="02 52 A2 03 F1">SecuRED Get Processor Firmware Version</option>
 	<option value="02 52 22 03 71">SecuRED Get MSR Firmware Version</option>
 	<option value="02 53 11 01 33 03 71">SecuRED Beep (Low Freq)</option>
  	<option value="02 53 49 01 06 03 1C">SecuRED Unmask 6 Leading Chars</option>
 	<option value="02 52 51 03 02">SecuRED Get KSN</option>
    </select>

  </body>
</html>
Notice that there is no inline JavaScript anywhere in the page. One-hundred percent of the app’s logic is in an external file (the script.js file). This makes for very clean separation of program logic from presentation markup, which in turn greatly facilitates code maintenance and debugging.
Rather than walk through the code (which is pretty self-explanatory), let’s talk about how to install and run it.
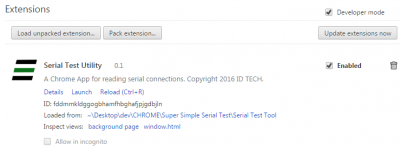
Launch your Chrome browser, if you haven’t already done so, and navigate to your chrome://extensions page. In the upper right corner, find and check the Developer Mode checkbox. See below.

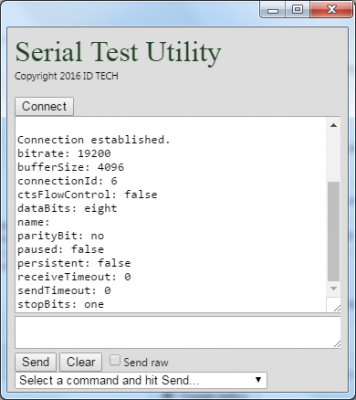
When you’ve checked the Developer Mode checkbox, and only when you’ve checked it, the Load unpacked extensions… button (on the left) will appear. Click that button. Navigate to the folder containing your 6 small files. Just designate that as the target folder and click OK. You’ll be back in the chrome://extensions page, and the app will appear in the list of available Extensions. Find the app and click the Launch link associated with it (look carefully in the above screenshot). The app’s main window will pop into view:

This is what the window will look like if you’ve already got a SecuRED card reader (or other serial device!) plugged into your COM3 port. Note that the JavaScript in script.js (see further above) is hard-coded to expect to use “COM3” as the port name. If your computer uses a different serial port, make a manual edit to the code, to use the correct name. (You can find this out from “Devices and Printers” in Windows. In Linux, your serial port may have a name like /dev/tty0 or /dev/ttyUSB0 or /dev/tty1.) And yes, by the way, this extension will work in Windows, or on Linux, or on Mac OS X, or ChromeOS, assuming Chrome is installed.
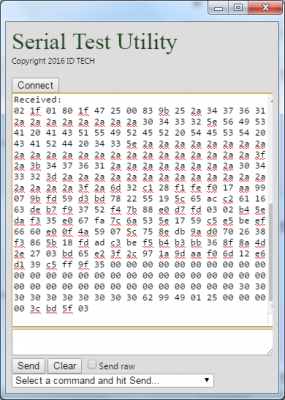
If you’ve connected successfully to your serial device, and that device happens to be ID TECH’s SecuRED card reader, go ahead and swipe a credit card through the slot. The card data will appear automatically in the top text area of the app window (note the hex values in the screenshot below):

Of course, knowing how to parse this data requires an understanding of ID TECH’s Enhanced Encrypted MSR Format. (Likewise, decryptingthe data requires that you understand DUKPT, key derivation, AES, and/or TDES.) We’ll discuss that in a future post. For now, it’s enough to note that the Serial Test Utility allows you to capture credit-card data instantly, and automatically, from Google Chrome, on any platform where Google Chrome runs. And you can use Chrome’s fantastic built-in debugging tools to debug your code, which is just JavaScript.
If you step through the code, you’ll see (all the way at the bottom of the code) that in order to receive serial data, we pass a receive callback function to chrome.serial.onReceive.addListener().The receive() function, in turn, calls a collect() function that accumulates received bytes into a buffer. The buffer is written (as text) to the app UI after a WAIT_TIME of 500 milliseconds. That is, when data comes in to the app from the card reader, we start a timer, and we accumulate data (as it arrives in small batches, a few milliseconds apart) into a buffer, then when the timer times out (after 500 msec) we flush the buffer to the screen (and start the buffering process over, if data is still coming). This allows us to batch a reasonable amount of data before putting it on-screen. (Otherwise, we’d potentially be writing lots of very short packets to the screen at intervals of a few milliseconds.)
The only other parts of the app that might not be self-evident are the small “command window” just above the Send and Clear buttons (see screenshot above), and the dropdown menu (“Select a command and hit Send”). The small text area above the Send button is an area where you can manually enter specific firmware commands that the target device (ID TECH’s SecuRED, in this case) knows how to respond to. The dropdown menu contains a few pre-loaded commands (like 02 53 11 01 33 03 71, which makes the SecuRED beep once) all ready to go. If you happen to know other hex commands (because maybe you’ve got the unit’s documentation in front of you?), you can enter commands that control or configure the device.
Even if you don’t use the SecuRED-specific dropdown menu control, the Serial Test Utility is a handy tool for sniffing any serial connection from your Chrome browser. It will display any data that crosses the serial port, whether it originated from an ID TECH card reader or not.
I hope you enjoyed this project. In an upcoming post, we’ll look at what it takes to communicate with a USB-HID device using Chrome’s connectivity APIs. That’s definitely worth knowing how to do!